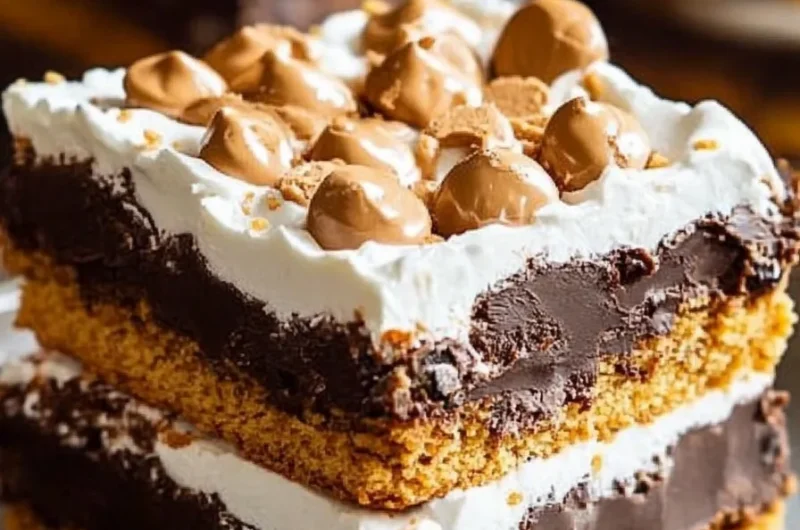
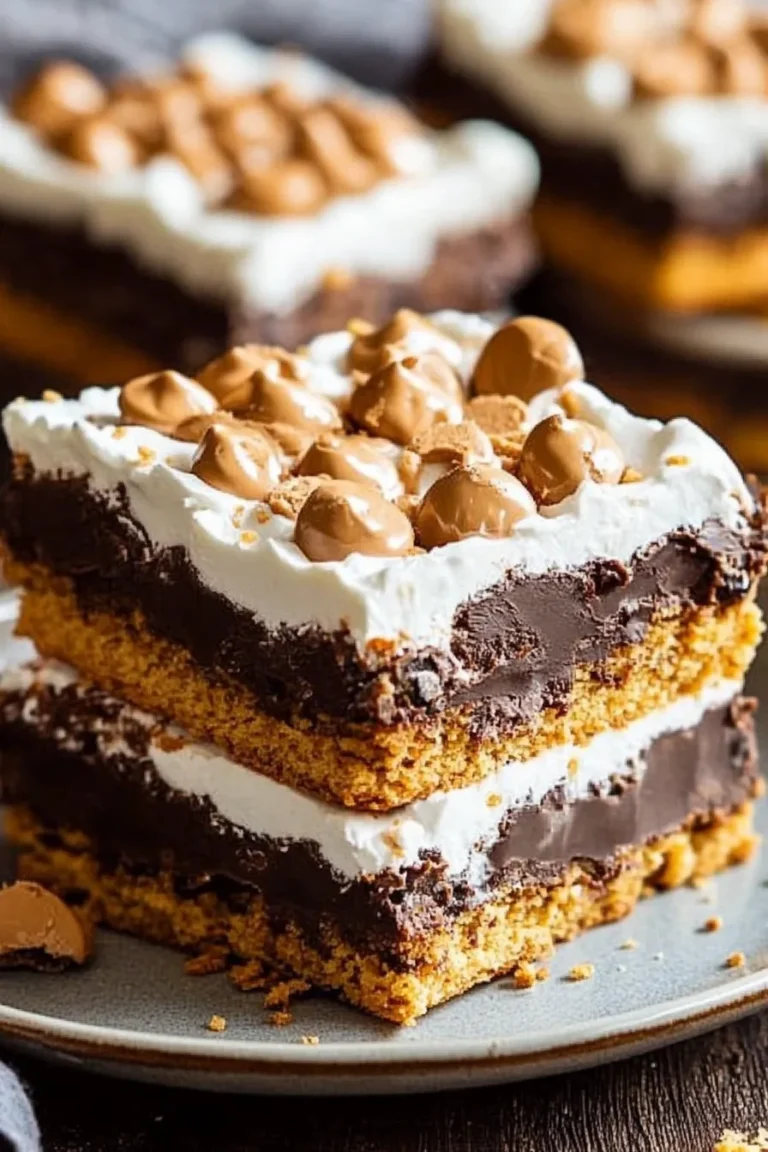
S’more Bars are an incredible treat that captures the heart of summer campfires in a deliciously convenient format. Imagine the classic combination of chocolate, graham crackers, and toasted marshmallows transformed into a bar that you can enjoy any time of the year. These bars are not just a dessert; they are a delightful experience of nostalgia and flavor that everyone will love. As you dive into the world of these gooey treats, you’ll find a recipe that is simple to follow yet yields unbelievable results. Whether you’re hosting a party, looking for a fun family dessert, or just want to satisfy your sweet tooth, S’more Bars are the answer to your cravings.
The first bite of these ooey-gooey S’more Bars takes you back to the simplicity of roasting marshmallows over an open flame, surrounded by laughter and warmth. Their buttery graham cracker crust, rich chocolate layer, and perfectly roasted marshmallows create a delightful combination that will have everyone clamoring for more. In this guide, you will discover why these bars are so special, how to make them, and tips for serving them perfectly. Let’s embark on a delicious journey that brings the joy of S’mores right into your kitchen!
Why You’ll Love This Recipe
S’more Bars are the perfect fusion of flavors and textures that will captivate both children and adults. Here are just a few reasons to fall in love with this amazing recipe:
1. Easy to Make – With straightforward instructions and minimal ingredients, even novice bakers can whip these up effortlessly.
2. No Campfire Required – You can enjoy the goodness of S’mores without the hassle of starting a fire or heading outdoors.
3. Great for Gatherings – These bars are perfect for parties, potlucks, or any occasion where sharing is involved.
4. Customizable – Feel free to adjust the recipe by adding nuts, different types of chocolate, or flavored marshmallows.
5. Make-Ahead Option – These bars can be made in advance and stored, making them a convenient treat.
6. Visually Appealing – The layers of chocolate and marshmallows create a stunning dessert that looks as good as it tastes.
With these compelling reasons, it’s easy to see why S’more Bars are a popular choice among dessert lovers. Their amazing combination of flavors will surely leave a lasting impression!
Preparation and Cooking Time
Making S’more Bars is a straightforward process that won’t take up too much of your time. Here’s a breakdown of the time commitment involved in this recipe:
– Preparation Time: 15 minutes
– Cooking Time: 25-30 minutes
– Cooling Time: 15-20 minutes
– Total Time: Approximately 1 hour
These times may vary slightly depending on your kitchen experience, but this framework gives you a good estimate for planning.
Ingredients
– 2 cups graham cracker crumbs
– ½ cup unsalted butter, melted
– ½ cup granulated sugar
– 1 teaspoon vanilla extract
– 1 cup semi-sweet chocolate chips
– 2 cups mini marshmallows
– 1 cup chocolate bars (e.g., Hershey’s) broken into pieces
– A pinch of salt
Step-by-Step Instructions
Creating delicious S’more Bars at home is simple if you follow these easy steps:
1. Preheat Oven: Preheat your oven to 350°F (175°C) and line a 9×13 inch baking pan with parchment paper, leaving an overhang for easy removal.
2. Prepare Crust: In a mixing bowl, combine the graham cracker crumbs, melted butter, sugar, and vanilla extract. Stir until fully combined.
3. Press Crust into Pan: Pour the mixture into the prepared baking pan and press it down firmly to create an even layer.
4. Add Chocolate: Sprinkle the semi-sweet chocolate chips evenly over the graham cracker crust.
5. Layer Marshmallows: Distribute the mini marshmallows over the chocolate chips, covering them well for that gooey texture.
6. Add More Chocolate: Place the broken chocolate bar pieces over the marshmallows, allowing them to melt into the bars as they bake.
7. Bake: Place the pan in the preheated oven and bake for 25-30 minutes or until the marshmallows are golden brown and the chocolate is melted.
8. Cool: Remove the bars from the oven and let them cool in the pan for about 15-20 minutes. This cooling step is crucial for cutting clean slices later.
9. Slice and Serve: Once cooled, lift the bars out using the parchment paper overhang, place them on a cutting board, and cut them into squares.
By following these steps, you’ll create incredible S’more Bars that everyone will rave about!
How to Serve
When it comes to serving S’more Bars, presentation and enhancement can elevate your dessert experience:
1. Plating: Use a clean plate or a dessert stand to showcase your S’more Bars attractively.
2. Garnish: Drizzle with chocolate sauce, or sprinkle graham cracker crumbs on top for added visual appeal.
3. Accompaniments: Pair with a scoop of vanilla ice cream or whipped cream for a delightful contrast in textures.
4. Beverage Options: Serve alongside chilled milk, coffee, or even hot chocolate to complement the flavors.
5. Storing Leftovers: If you have any leftovers, store them in an airtight container at room temperature for up to three days.
With these serving tips, you can create a delightful dessert experience that will impress your guests and make your gathering memorable! Enjoy your S’more Bars and the joy they bring!
Additional Tips
– Use Quality Ingredients: For the best flavor, opt for high-quality chocolate, graham crackers, and marshmallows. The quality of your ingredients can significantly impact the taste and overall experience of your S’more Bars.
– Allow Cooling Time: Be patient during the cooling process. If you cut the bars too soon, they may fall apart. Allowing them to cool adequately helps maintain their structure.
– Serve Warm: For a delicious treat, serve your S’more Bars warm. The chocolate will be gooey, and the marshmallows will be delightfully soft.
– Experiment with Toppings: Feel free to add toppings such as crushed graham crackers or drizzle with caramel sauce. This adds an extra layer of flavor and texture.
– Enjoy with Friends: S’more Bars are best enjoyed with others. Share them at gatherings, and you’ll create lasting memories filled with laughter and sweet indulgence.
Recipe Variation
There are countless ways to customize your S’more Bars! Here are a few exciting variations to consider:
1. Peanut Butter Addition: Swirl in some creamy peanut butter between the chocolate and marshmallow layers for a rich, nutty flavor.
2. Nutty Twist: Add chopped nuts, such as walnuts or pecans, to the chocolate layer for an added crunch.
3. Flavored Marshmallows: Use flavored marshmallows like strawberry or caramel for a unique twist on the classic S’more flavor.
4. Cookie Crust: Substitute graham cracker crumbs with crushed chocolate cookies or vanilla wafers for a different flavor profile.
5. Stuffed Bars: Try adding a layer of cookie dough or brownie batter on top of the crust for a decadent twist.
Freezing and Storage
– Storage: To keep your S’more Bars fresh, store them in an airtight container at room temperature for up to three days.
– Freezing: S’more Bars freeze well. Wrap them individually in plastic wrap, then place them in a freezer-safe container. They can last up to three months in the freezer.
– Reheating: If you’d like to serve the bars warm after freezing, you can reheat them in the microwave for about 15-20 seconds. This will help revive the gooey texture.
Special Equipment
Preparing S’more Bars requires minimal equipment. Here’s what you will need:
– Mixing bowls: For combining the ingredients.
– 9×13 inch baking pan: To bake the bars evenly.
– Parchment paper: For easy removal and clean-up.
– Measuring cups and spoons: To ensure accurate measurements for your ingredients.
– Cooling rack: Optional, but useful for cooling your bars evenly.
Frequently Asked Questions
How can I make my S’more Bars gluten-free?
To make these bars gluten-free, use gluten-free graham cracker crumbs and check that your chocolate products are also gluten-free.
Can I make S’more Bars in advance?
Absolutely! You can prepare and bake them a day in advance. Just store them properly to keep them fresh until you’re ready to serve.
What can I substitute instead of butter?
You can use coconut oil or vegan margarine as a healthier alternative to butter in this recipe.
Why did my marshmallows not toast?
If your marshmallows didn’t toast, they may not have been in the oven long enough. Ensure they’re golden brown on top before removing the bars.
Can I double the recipe?
Yes! If you’d like to make a larger batch, simply double the ingredients and use two pans or bake them in a larger baking dish.
Conclusion
S’more Bars are a delicious, nostalgic treat that brings the classic flavors of a campfire favorite right to your kitchen. With their easy-to-follow recipe and endless customization options, they are sure to be a hit at any gathering. Whether you’re enjoying them during a cozy movie night or sharing them at a gathering, these bars will leave everyone asking for the recipe. Don’t hesitate to experiment with variations, and make the dessert your own!
S’more Bars: An Amazing Ultimate Recipe for Your Next Gathering
- Total Time: 23 minute
Ingredients
– 2 cups graham cracker crumbs
– ½ cup unsalted butter, melted
– ½ cup granulated sugar
– 1 teaspoon vanilla extract
– 1 cup semi-sweet chocolate chips
– 2 cups mini marshmallows
– 1 cup chocolate bars (e.g., Hershey’s) broken into pieces
– A pinch of salt
Instructions
Creating delicious S’more Bars at home is simple if you follow these easy steps:
1. Preheat Oven: Preheat your oven to 350°F (175°C) and line a 9×13 inch baking pan with parchment paper, leaving an overhang for easy removal.
2. Prepare Crust: In a mixing bowl, combine the graham cracker crumbs, melted butter, sugar, and vanilla extract. Stir until fully combined.
3. Press Crust into Pan: Pour the mixture into the prepared baking pan and press it down firmly to create an even layer.
4. Add Chocolate: Sprinkle the semi-sweet chocolate chips evenly over the graham cracker crust.
5. Layer Marshmallows: Distribute the mini marshmallows over the chocolate chips, covering them well for that gooey texture.
6. Add More Chocolate: Place the broken chocolate bar pieces over the marshmallows, allowing them to melt into the bars as they bake.
7. Bake: Place the pan in the preheated oven and bake for 25-30 minutes or until the marshmallows are golden brown and the chocolate is melted.
8. Cool: Remove the bars from the oven and let them cool in the pan for about 15-20 minutes. This cooling step is crucial for cutting clean slices later.
9. Slice and Serve: Once cooled, lift the bars out using the parchment paper overhang, place them on a cutting board, and cut them into squares.
By following these steps, you’ll create incredible S’more Bars that everyone will rave about!
- Prep Time: 15 minutes
- Cook Time: 25-30 minutes
Nutrition
- Serving Size: 12 bars
- Calories: 240 per bar
- Fat: 10g
- Protein: 2g