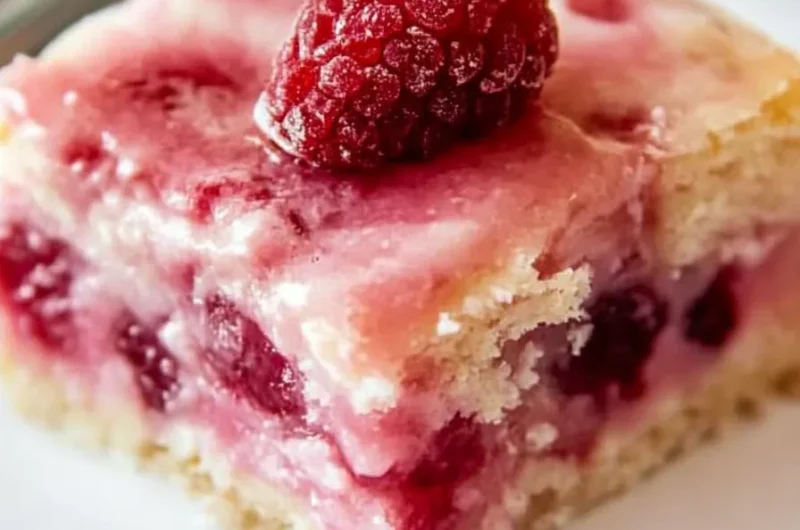
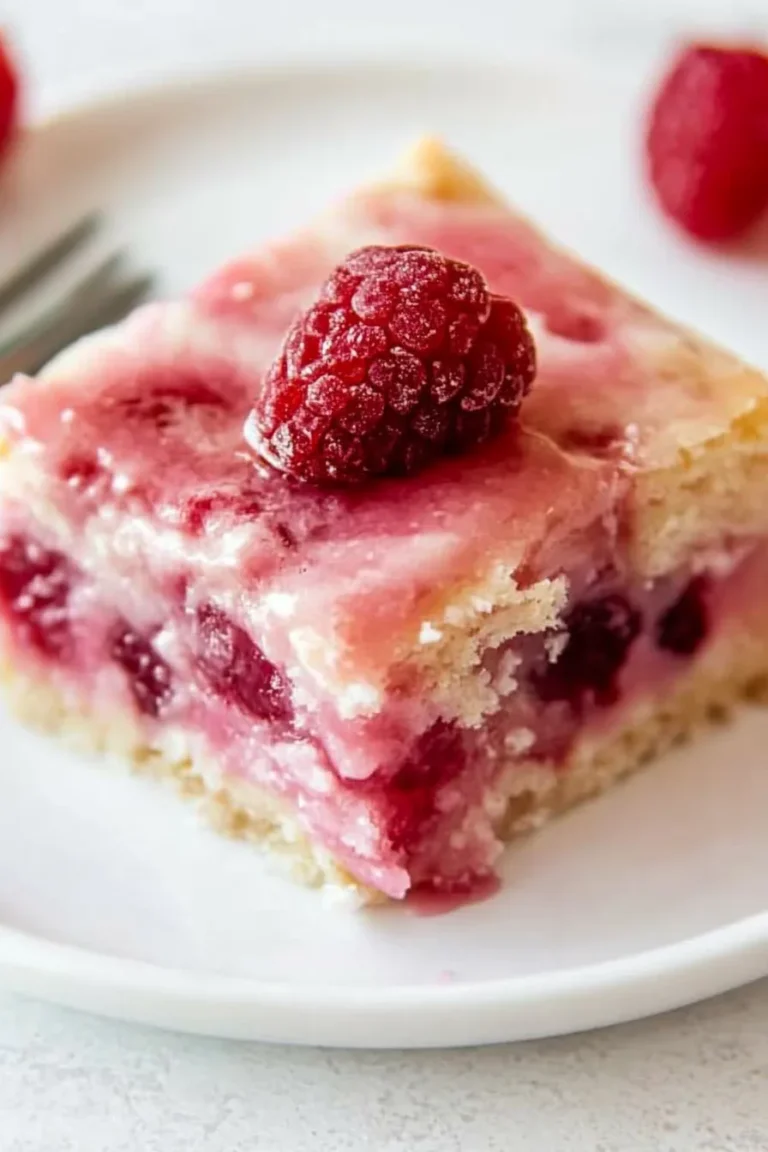
Raspberry Lemonade Bars are a delightful treat that captures the essence of summer in every bite. With their bright, tart flavors and a sweet, buttery crust, these bars are perfect for a sunny day picnic or a backyard barbecue. Imagine sinking your teeth into a tangy raspberry layer that dances on your palate, complemented by a melt-in-your-mouth crust. These bars are not just a dessert; they embody the joyful spirit of summer gatherings and family get-togethers.
If you have a craving for something refreshing and sweet, Raspberry Lemonade Bars are a fantastic option. The combination of zesty lemon and sweet raspberries creates a taste sensation that is incredibly satisfying. Additionally, their beautiful presentation adds to their allure, making them ideal for serving at special occasions or simply sharing with friends. With this recipe, you’ll experience why these bars are loved by many and how easy they are to make.
In this article, you’ll discover everything you need to know about preparing these wonderful Raspberry Lemonade Bars. From detailed ingredients to a step-by-step guide, each aspect will help you achieve perfection in your baking. Whether you’re an experienced baker or a novice home cook, these bars will impress everyone who is lucky enough to indulge. Let’s dive into what makes Raspberry Lemonade Bars an unforgettable addition to your summer recipe collection.
Why You’ll Love This Recipe
Raspberry Lemonade Bars have a special charm that makes them a favorite for many. Here are just a few reasons why you’ll adore this recipe:
1. Refreshing Flavors – The combination of lemon and raspberry provides a burst of refreshing taste.
2. Easy Preparation – With straightforward steps, these bars can be prepared quickly.
3. Perfect for Summer – They are a light dessert option, making them ideal for warmer weather.
4. Great for Gatherings – Their vibrant colors and flavors will make them a hit at parties.
5. Make-Ahead Friendly – You can prepare them a day in advance, making entertaining effortless.
6. Customizable – Adjust the sweetness or tartness to suit your personal preferences.
These factors combined show why Raspberry Lemonade Bars are loved by so many and make them a must-try recipe this summer!
Preparation and Cooking Time
Preparing Raspberry Lemonade Bars will take approximately 1 hour and 15 minutes, including both preparation and cooking. Here’s a breakdown of the timings:
– Preparation Time: 20-30 minutes
– Cooking Time: 25-30 minutes
– Cooling Time: 15-20 minutes
These times are estimates and may vary based on your experience and kitchen setup.
Ingredients
– For the Crust:
– 1 cup unsalted butter, softened
– ½ cup granulated sugar
– 2 cups all-purpose flour
– ½ teaspoon salt
– For the Filling:
– 1 cup granulated sugar
– 1 tablespoon lemon zest
– 1/2 cup fresh lemon juice (about 3-4 lemons)
– 2 large eggs
– 1 cup fresh raspberries (or frozen, thawed)
– 2 tablespoons cornstarch
– For Garnish (optional):
– Powdered sugar, for dusting
– Fresh raspberries and lemon slices for decoration
Step-by-Step Instructions
Creating Raspberry Lemonade Bars is simple if you follow these easy steps:
1. Preheat Oven: Preheat your oven to 350°F (175°C). Grease a 9×13 inch baking dish or line it with parchment paper for easy removal.
2. Prepare the Crust: In a medium bowl, cream together the softened butter and granulated sugar until light and fluffy.
3. Add Dry Ingredients: Gradually mix in the flour and salt until crumbly. Press this mixture into the bottom of the prepared baking dish evenly, creating a crust layer.
4. Bake the Crust: Place the baking dish in the preheated oven and bake for 15-20 minutes, or until lightly golden.
5. Prepare the Filling: While the crust is baking, whisk together the sugar, lemon zest, lemon juice, and eggs in a bowl until well combined. Add the cornstarch and whisk until smooth.
6. Add Raspberries: Gently fold in the fresh raspberries, being careful not to break them apart too much.
7. Combine and Bake: Pour the filling over the pre-baked crust and return to the oven. Bake for an additional 25-30 minutes, or until the filling is set.
8. Cool: Allow the bars to cool in the pan for about 15–20 minutes at room temperature. Then, transfer to the refrigerator to chill completely.
9. Serve: Once cooled, cut into squares or rectangles as desired. Dust with powdered sugar and garnish with fresh raspberries and lemon slices if desired.
These straightforward instructions will guide you in creating these incredible Raspberry Lemonade Bars with ease.
How to Serve
Serving Raspberry Lemonade Bars can elevate the experience for you and your guests. Here are some ideas to make your servings memorable:
1. Presentation: Serve the bars on a beautiful platter or cake stand to showcase their vibrant colors.
2. Accompaniments: Pair with a scoop of vanilla ice cream or a dollop of whipped cream for added indulgence.
3. Garnishing: Use fresh mint leaves or edible flowers for an elegant touch.
4. Beverage Pairing: Complement with a refreshing glass of iced tea or lemonade to enhance the summery vibe.
5. Personal Touch: Consider providing a variety of toppings, such as shredded coconut or chocolate drizzle, so guests can customize their servings.
With these serving suggestions, Raspberry Lemonade Bars are sure to leave a lasting impression on anyone who tries them!
Additional Tips
– Use Fresh Raspberries: Fresh raspberries enhance the flavor and texture of your Raspberry Lemonade Bars. They provide natural sweetness and a delightful burst.
– Let Them Chill: Allowing the bars to cool completely in the refrigerator will help set the filling and improve their texture. It makes them easier to cut and serve.
– Adjust to Taste: Feel free to tweak the ratios in the filling. If you prefer a sweeter dessert, increase the sugar slightly; for more tang, add more lemon juice or zest.
– Experiment with Citrus: Try incorporating other citrus fruits, like lime or orange, into your bars for a unique twist on flavor.
– Use a Citrus Zester: A citrus zester will help achieve fine lemon zest, which integrates more fully into the filling, boosting its flavor.
Recipe Variation
Get creative with your Raspberry Lemonade Bars! Here are a few variations you can try:
1. Berry Medley: Combine raspberries with other berries, such as blueberries or blackberries, to create a mixed berry version of the bars.
2. Lemon Only Bars: For a classic lemon bar, use only lemon juice and zest in the filling, omitting the raspberries.
3. Coconut Topping: Add a toasted coconut layer on top after baking for a tropical flair.
4. Graham Cracker Crust: Substitute the all-purpose flour in the crust with crushed graham crackers for a unique texture and flavor.
5. Drizzle with Glaze: Consider topping the finished bars with a lemon glaze for an extra sweet and tangy finish.
Freezing and Storage
– Storage: Keep the Raspberry Lemonade Bars covered in the refrigerator, where they can last for up to one week.
– Freezing: These bars freeze well! Wrap them tightly in plastic wrap and then in aluminum foil. They can be stored in the freezer for up to three months. Thaw in the fridge before serving.
Special Equipment
To successfully prepare Raspberry Lemonade Bars, you’ll need a few essential kitchen tools:
– 9×13 inch Baking Dish: For baking the bars. Line it with parchment paper for easy removal.
– Mixing Bowls: Use different sizes for creaming the butter and sugar and mixing the filling.
– Whisk: For blending the filling ingredients smoothly.
– Rubber Spatula: Great for folding in the raspberries gently.
– Cooling Rack: Useful for cooling the bars evenly after baking.
Frequently Asked Questions
Can I use frozen raspberries instead of fresh?
Yes, frozen raspberries can be used in place of fresh ones. Just be sure to thaw and drain any excess moisture before adding them to the filling.
What if I don’t have cornstarch?
You can substitute cornstarch with an equal amount of all-purpose flour, although it may slightly alter the texture of the filling.
How can I tell when the bars are done baking?
The filling should look set and slightly jiggle in the center when you gently shake the pan. A toothpick inserted into the middle should come out clean or with a few moist crumbs.
Can I make these bars gluten-free?
Absolutely! Use a gluten-free flour blend in place of all-purpose flour for the crust and check that your cornstarch is gluten-free as well.
Are Raspberry Lemonade Bars suitable for kids?
Yes, they are kid-friendly and have a delightful sweet-tart flavor that children generally love!
Conclusion
Raspberry Lemonade Bars are a perfect summertime treat that combines refreshing flavors with an easy-to-follow recipe. Whether you’re having a picnic, hosting a barbecue, or wanting something sweet to enjoy on a hot day, these bars will be a hit. Their bright colors, delicious taste, and simplicity make them a delightful addition to your dessert repertoire. Embrace your inner baker and impress your family and friends with these delightful Raspberry Lemonade Bars that will undoubtedly brighten up any gathering.
Raspberry Lemonade Bars: An Incredible Ultimate Recipe for Summer
- Total Time: 45 minutes
Ingredients
– For the Crust:
– 1 cup unsalted butter, softened
– ½ cup granulated sugar
– 2 cups all-purpose flour
– ½ teaspoon salt
– For the Filling:
– 1 cup granulated sugar
– 1 tablespoon lemon zest
– 1/2 cup fresh lemon juice (about 3-4 lemons)
– 2 large eggs
– 1 cup fresh raspberries (or frozen, thawed)
– 2 tablespoons cornstarch
– For Garnish (optional):
– Powdered sugar, for dusting
– Fresh raspberries and lemon slices for decoration
Instructions
Creating Raspberry Lemonade Bars is simple if you follow these easy steps:
1. Preheat Oven: Preheat your oven to 350°F (175°C). Grease a 9×13 inch baking dish or line it with parchment paper for easy removal.
2. Prepare the Crust: In a medium bowl, cream together the softened butter and granulated sugar until light and fluffy.
3. Add Dry Ingredients: Gradually mix in the flour and salt until crumbly. Press this mixture into the bottom of the prepared baking dish evenly, creating a crust layer.
4. Bake the Crust: Place the baking dish in the preheated oven and bake for 15-20 minutes, or until lightly golden.
5. Prepare the Filling: While the crust is baking, whisk together the sugar, lemon zest, lemon juice, and eggs in a bowl until well combined. Add the cornstarch and whisk until smooth.
6. Add Raspberries: Gently fold in the fresh raspberries, being careful not to break them apart too much.
7. Combine and Bake: Pour the filling over the pre-baked crust and return to the oven. Bake for an additional 25-30 minutes, or until the filling is set.
8. Cool: Allow the bars to cool in the pan for about 15–20 minutes at room temperature. Then, transfer to the refrigerator to chill completely.
9. Serve: Once cooled, cut into squares or rectangles as desired. Dust with powdered sugar and garnish with fresh raspberries and lemon slices if desired.
These straightforward instructions will guide you in creating these incredible Raspberry Lemonade Bars with ease.
- Prep Time: 15 minutes
- Cook Time: 30 minutes
Nutrition
- Serving Size: 12 bars
- Calories: 210 kcal
- Fat: 10g
- Protein: 3g