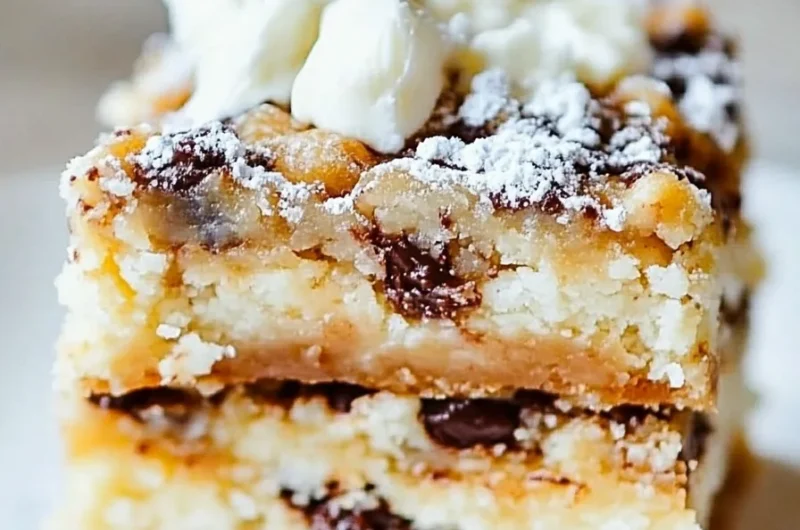
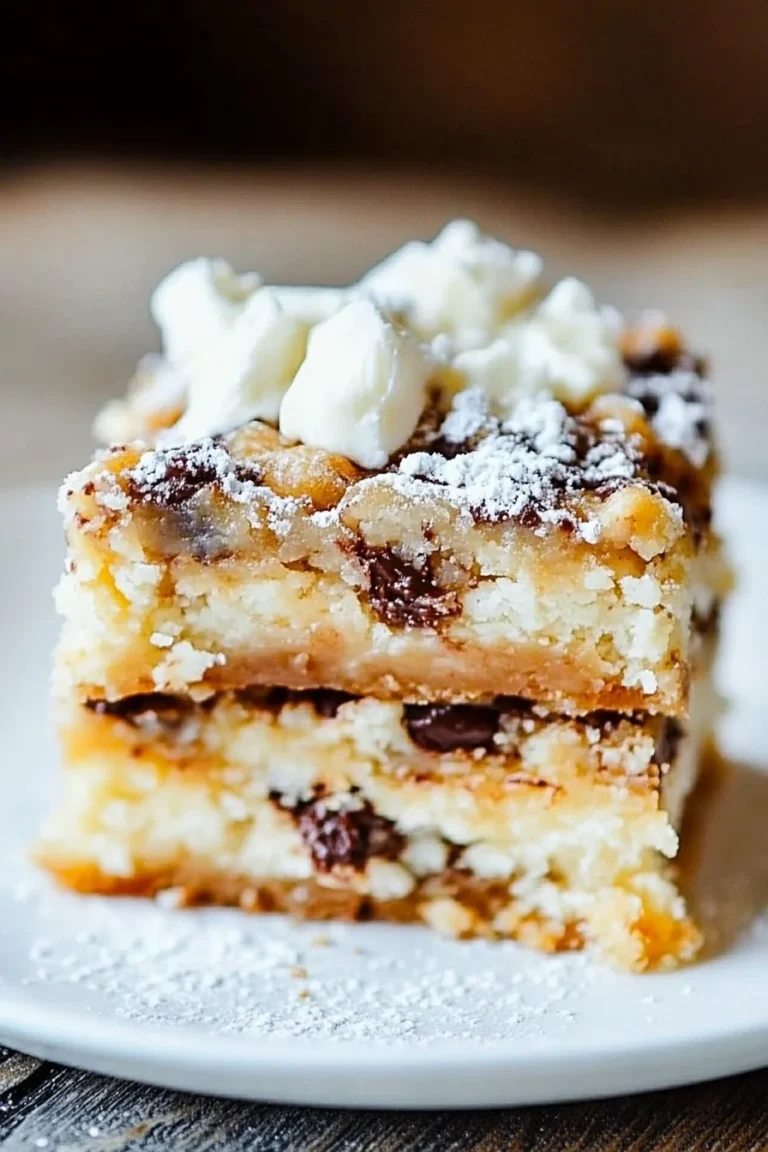
Magic Cookie Bars with Condensed Coconut Milk are a delightful treat that combines sweetness with a hint of tropical flair. These bars, often referred to as “Magic Bars,” are renowned for their simple preparation and incredible flavor profile, making them a favorite among dessert lovers. The rich, chewy layers topped with sweetened condensed coconut milk create a wonderfully gooey texture that melts in your mouth with every bite.
These bars are truly magical for many reasons. They are not just quick to make, but also versatile, allowing you to customize them with your favorite toppings. Whether for a holiday gathering, a cozy family night at home, or just a well-deserved treat for yourself, these bars are a brilliant addition. As you prepare to discover this amazing recipe, be ready to impress your family and friends with your baking prowess!
In this comprehensive guide, you will learn about the charm of Magic Cookie Bars with Condensed Coconut Milk, why this recipe is so loved, and how easy it is to whip up a batch in no time. Get ready to explore the delightful flavors, the step-by-step preparing process, and serving suggestions that will elevate your baked creation into a stunning dessert to remember!
Why You’ll Love This Recipe
There are many reasons to fall head over heels for Magic Cookie Bars with Condensed Coconut Milk. Some of the key reasons include:
1. Quick and Easy: The recipe requires minimal preparation time, making it perfect for those busy days when dessert is needed on short notice.
2. Minimal Ingredients: Most ingredients are pantry staples. This means you don’t need to make a special trip to the store.
3. Customizable: You can easily modify the ingredients. Consider adding your favorite nuts, chocolate chips, or dried fruits for a personalized touch.
4. Perfect for Sharing: These bars make a great addition to potlucks, parties, or family gatherings. A tray of these bars is sure to be a hit.
5. Irresistibly Delicious: The combination of flavors and textures from the coconut, chocolate, and condensed milk make for an incredible taste experience.
6. No-Bake Option: The more traditional version requires baking, but you can create a no-bake version by allowing the bars to set in the refrigerator.
Once you experience the bliss of these bars, you’ll understand why they are a beloved treat to many. The contrasting textures and rich flavors will leave your taste buds dancing!
Preparation and Cooking Time
Creating Magic Cookie Bars with Condensed Coconut Milk is a breeze. Here’s a breakdown of the time needed to prepare and enjoy this scrumptious dessert:
– Preparation Time: 15 minutes
– Cooking Time: 25-30 minutes
– Cooling Time: 1 hour (may vary based on your cooling method)
Total time from start to finish varies around 1 hour and 45 minutes, allowing for minimal fuss and maximum enjoyment.
Ingredients
– 1 ½ cups graham cracker crumbs
– ½ cup unsalted butter, melted
– 1 can (14 oz) sweetened condensed milk
– 1 cup semi-sweet chocolate chips
– 1 cup sweetened shredded coconut
– 1 cup chopped nuts (such as walnuts or pecans)
– 1 teaspoon vanilla extract (optional)
Step-by-Step Instructions
Making Magic Cookie Bars with Condensed Coconut Milk is straightforward. Follow these steps for delicious results:
1. Preheat the Oven: Set your oven to 350°F (175°C).
2. Prepare the Pan: Grease a 9×13-inch baking pan or line it with parchment paper for easier removal.
3. Make the Crust: In a medium bowl, combine the graham cracker crumbs and melted butter. Stir until all crumbs are evenly coated. Press the mixture firmly into the bottom of the prepared baking pan.
4. Layer the Ingredients: Evenly distribute the semi-sweet chocolate chips over the graham cracker crust. Follow with a layer of shredded coconut and topped with chopped nuts.
5. Add the Condensed Milk: Pour the sweetened condensed milk evenly over the layered ingredients, ensuring everything is well coated.
6. Bake: Place the pan in the preheated oven. Bake for 25-30 minutes or until the edges turn golden brown.
7. Cool the Bars: Remove from the oven and allow the bars to cool in the pan for about an hour. If you want to expedite the cooling process, place them in the refrigerator.
8. Cut into Squares: Once cooled, lift the bars out using the parchment paper (if used). Cut into squares or rectangles, as you prefer.
9. Serve and Enjoy: These bars can be served warm or at room temperature.
You’re now more than ready to treat yourself and others with this delightful recipe!
How to Serve
Serving Magic Cookie Bars with Condensed Coconut Milk can be done elegantly or simply, depending on the occasion. Here are some suggestions to elevate your serving experience:
1. Presentation: Arrange the bars on a nice platter or tiered cake stand for an impressive display.
2. Accompaniments: Pair them with a scoop of vanilla ice cream or whipped cream for an indulgent dessert experience.
3. Garnish: Consider drizzling some chocolate or caramel sauce on top for a beautiful finishing touch.
4. Packaging: These bars make great gifts. Pack them in a decorative box with a little note for friends or family.
5. Beverage Pairing: Serve these magic bars alongside a hot cup of coffee or tea, or opt for cold milk for a classic combination.
With these serving tips, your presentation of Magic Cookie Bars with Condensed Coconut Milk will not only be delicious but visually appealing too. Enjoy sharing this treat with others or relish them as a delightful addition to your own dessert menu!
Additional Tips
– Use Fresh Ingredients: Using fresh coconut and high-quality chocolate chips enhances the overall flavor.
– Cut After Cooling: Ensure the bars are thoroughly cooled before cutting for clean edges and perfect squares.
– Experiment with Cooking Times: Oven temperatures may vary, so keep an eye on the bars to prevent over-baking or under-baking.
Recipe Variation
Feel free to customize your Magic Cookie Bars with Condensed Coconut Milk! Here are some fun variations to explore:
1. Peanut Butter Swirl: Drizzle melted peanut butter over the condensed milk layer before baking for a nutty flavor.
2. Dried Fruit Mix: Add dried cranberries or apricots for a chewy texture and fruity finish.
3. Different Nuts: Experiment with various nuts like almonds, macadamia nuts, or cashews for a different taste and crunch.
4. Cacao Nibs: For a rich chocolate experience without added sugar, substitute some of the chocolate chips with cacao nibs.
Freezing and Storage
– Storage: Keep the bars in an airtight container at room temperature for 3-5 days. If you prefer them colder, store them in the refrigerator for longer freshness.
– Freezing: These bars freeze beautifully! Wrap them individually in plastic wrap and place them in a freezer-safe bag. They can last up to 3 months. Allow them to thaw in the refrigerator before serving.
Special Equipment
To create these magical treats, gather the following kitchen essentials:
– 9×13 inch Baking Pan: This size provides the perfect thickness for the bars.
– Mixing Bowl: For combining your graham cracker crumbs and melted butter.
– Offset Spatula: Ideal for spreading the layers evenly, ensuring a smooth top.
– Parchment Paper: Helpful for easy removal of the bars from the pan after baking.
– Sharp Knife: For cutting the cooled bars into perfect squares.
Frequently Asked Questions
Can I use unsweetened coconut instead of sweetened?
Yes, but you might want to increase the sugar or sweetened condensed milk slightly for desired sweetness.
Do I have to bake the bars?
While baking gives a distinct texture and flavor, you can create a no-bake version by chilling the mixture instead.
Can I substitute graham crackers?
Certainly! Crushed vanilla wafers or digestive biscuits can serve as a tasty alternative for the crust.
What if I don’t have condensed milk?
You can substitute with homemade condensed milk or a dairy-free alternative found in stores.
How do I store leftover bars?
Store in an airtight container at room temperature, or refrigerate to extend their shelf life.
Conclusion
Magic Cookie Bars with Condensed Coconut Milk are more than just a dessert; they are an experience! Their rich layers of chewy, chocolaty goodness will enchant your taste buds from the very first bite. Perfect for any occasion, this recipe’s simplicity and adaptability make it a must-try. Once you bake a batch, you’ll likely find yourself making them time and again, always eager to share this delectable delight with friends and family.
Magic Cookie Bars with Condensed Coconut Milk: The Ultimate Amazing Recipe
- Total Time: 50 minute
Ingredients
– 1 ½ cups graham cracker crumbs
– ½ cup unsalted butter, melted
– 1 can (14 oz) sweetened condensed milk
– 1 cup semi-sweet chocolate chips
– 1 cup sweetened shredded coconut
– 1 cup chopped nuts (such as walnuts or pecans)
– 1 teaspoon vanilla extract (optional)
Instructions
Making Magic Cookie Bars with Condensed Coconut Milk is straightforward. Follow these steps for delicious results:
1. Preheat the Oven: Set your oven to 350°F (175°C).
2. Prepare the Pan: Grease a 9×13-inch baking pan or line it with parchment paper for easier removal.
3. Make the Crust: In a medium bowl, combine the graham cracker crumbs and melted butter. Stir until all crumbs are evenly coated. Press the mixture firmly into the bottom of the prepared baking pan.
4. Layer the Ingredients: Evenly distribute the semi-sweet chocolate chips over the graham cracker crust. Follow with a layer of shredded coconut and topped with chopped nuts.
5. Add the Condensed Milk: Pour the sweetened condensed milk evenly over the layered ingredients, ensuring everything is well coated.
6. Bake: Place the pan in the preheated oven. Bake for 25-30 minutes or until the edges turn golden brown.
7. Cool the Bars: Remove from the oven and allow the bars to cool in the pan for about an hour. If you want to expedite the cooling process, place them in the refrigerator.
8. Cut into Squares: Once cooled, lift the bars out using the parchment paper (if used). Cut into squares or rectangles, as you prefer.
9. Serve and Enjoy: These bars can be served warm or at room temperature.
You’re now more than ready to treat yourself and others with this delightful recipe!
- Prep Time: 15 minutes
- Cook Time: 25-30 minutes
Nutrition
- Serving Size: 12 bars
- Calories: 210 kcal
- Fat: 10g
- Protein: 2g