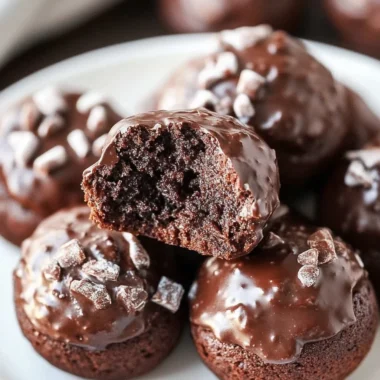
Fudgiest Gluten-Free Brownies are a decadent delight that will satisfy your chocolate cravings like nothing else. Imagine biting into a rich, gooey brownie that starts to melt in your mouth, combining deep chocolate flavor with a hint of sweetness. These brownies are not only fudgy but also gluten-free, making them perfect for those with dietary restrictions or anyone seeking a delightful treat.
If you’ve ever tasted a brownie that feels like a warm hug for your taste buds, then the Fudgiest Gluten-Free Brownies will strike the right chord. The texture is surreal—deeply fudgy on the inside, with just enough crust on the outside. Each bite will have you yearning for more, and you’ll soon understand why these brownies are loved by many. This recipe encapsulates the essence of indulgence while keeping it simple and easy to follow.
In this guide, we will explore everything you need to know about whipping up these incredible brownies. From the reasons why you’ll adore this recipe to the precise preparation you’ll need, we’ve got it all covered. Each aspect is designed to make baking these fudgy delights enjoyable and rewarding. Whether you are catering to gluten-sensitive guests or just looking for a decadent dessert, this is the perfect choice!
Why You’ll Love This Recipe
The Fudgiest Gluten-Free Brownies come together beautifully and deliver on flavor, texture, and satisfaction. Here are some compelling reasons why you’ll absolutely love this recipe:
1. Irresistibly Fudgy: The texture is incredibly rich and moist, giving you that classic brownie experience.
2. Gluten-Free Goodness: Made without any gluten-containing ingredients, everyone can enjoy these treats without worry.
3. Quick and Easy: With simple steps and minimal ingredients, you can whip these up in no time.
4. Customizable: Add in your favorite extras, like nuts, chocolate chips, or even a swirl of caramel for extra indulgence.
5. Perfect for Any Occasion: Whether it’s a birthday, potluck, or casual family dinner, these brownies fit right in.
6. Satisfying Cravings: They quell your sweet tooth while delivering that intense chocolate flavor.
7. No Specialty Ingredients: Most ingredients are staples you likely already have in your kitchen.
8. Kid-Friendly: These fudgy brownies are a hit with both kids and adults alike—great for family gatherings.
Knowing what makes these brownies so special will elevate your excitement to bake them. Each reason underscores just how delightful these fudgy treats can be, leaving you and your loved ones eager for a second helping.
Preparation and Cooking Time
To prepare and enjoy your Fudgiest Gluten-Free Brownies, all you need is about 1 hour and 10 minutes. This includes preparation and baking time. Here’s a breakdown of how long each part will take:
– Preparation Time: 20 minutes
– Cooking Time: 25-30 minutes
– Cooling Time: 20 minutes
These estimates may vary slightly based on your baking experience and how efficiently your kitchen is set up, but they provide a solid outline for your brownie-making adventure.
Ingredients
– 1 cup almond flour
– 1/2 cup unsweetened cocoa powder
– 1 cup granulated sugar
– 1/2 teaspoon salt
– 1/4 teaspoon baking soda
– 3 large eggs
– 1/2 cup melted butter (or coconut oil for dairy-free option)
– 1 teaspoon vanilla extract
– 1 cup semi-sweet chocolate chips
– Optional: 1/2 cup chopped nuts (walnuts, pecans, or your choice)
Step-by-Step Instructions
Follow these straightforward steps to create the Fudgiest Gluten-Free Brownies:
1. Preheat the Oven: Preheat your oven to 350°F (175°C) and grease an 8-inch square baking pan or line it with parchment paper.
2. Mix Dry Ingredients: In a large bowl, combine the almond flour, cocoa powder, granulated sugar, salt, and baking soda. Stir until well combined.
3. Combine Wet Ingredients: In another bowl, whisk together the eggs, melted butter, and vanilla extract until smooth.
4. Combine Mixtures: Gradually pour the wet ingredients into the dry ingredients. Stir until just combined, being careful not to overmix.
5. Add Chocolate Chips: Fold in the semi-sweet chocolate chips, and the optional nuts if you’re using them, to give your brownies an exciting texture.
6. Pour Batter: Transfer the brownie batter to the prepared baking pan. Spread evenly using a spatula.
7. Bake: Place in the preheated oven and bake for 25-30 minutes. The brownies should be set on the edges but slightly soft in the center.
8. Cool: Remove from the oven and let the brownies cool in the pan for about 20 minutes. Once cooled, lift them out using the parchment paper if you used it and cut into squares.
9. Serve: Once cut, feel free to garnish with additional chocolate chips, nuts, or a dusting of powdered sugar for presentation.
Following these steps will ensure you create a batch of fudgy, gooey brownies that everyone will love.
How to Serve
When it comes to serving your Fudgiest Gluten-Free Brownies, consider the following tips to make the experience memorable:
1. Presentation: Place the brownies on a decorative platter or a cake stand to create an inviting look.
2. Garnishes: Top with a scoop of vanilla ice cream or a dollop of whipped cream for a rich dessert experience.
3. Maintaining Warmth: Serve them warm for the best, gooey experience—just a quick warm-up in the microwave can do the trick.
4. Beverage Pairing: Pair these brownies with a glass of milk, a cup of coffee, or even a dessert wine to enhance their flavor.
5. Packaging for Gifts: If you’re gifting these brownies, consider wrapping them in decorative cellophane and tying them with a beautiful ribbon.
By keeping these serving tips in mind, you can elevate your Fudgiest Gluten-Free Brownies into a delightful dessert experience that will impress everyone.
Additional Tips
– Use Quality Ingredients: For the best flavor, opt for high-quality cocoa powder and chocolate chips. The better the cocoa, the more intense the chocolate flavor will be.
– Check for Doneness: Insert a toothpick into the brownies. If it comes out with a few moist crumbs, they are ready. Avoid overbaking for a fudgier texture.
– Let Them Cool: Be patient and let the brownies cool before cutting. This helps them set and makes them easier to slice without crumbling.
– Pair Wisely: Serve with toppings like ice cream, whipped cream, or fresh berries to elevate the dessert experience.
Recipe Variation
Feel free to switch things up! Here are a few delicious variations to try:
1. Nut-Free Option: Omit the nuts if you are catering to allergies, or replace them with seeds like sunflower or pumpkin seeds for crunch.
2. Mint Chocolate Brownies: Add a few drops of peppermint extract for a refreshing mint flavor.
3. Spicy Brownies: Incorporate a pinch of cayenne pepper or chili powder for a spicy kick that pairs beautifully with the chocolate.
4. Peanut Butter Swirl: Add dollops of peanut butter into the batter before baking and use a knife to swirl it for added richness.
Freezing and Storage
– Storage: Keep your brownies in an airtight container at room temperature for up to 4 days.
– Freezing: These brownies can be frozen for up to 3 months. Wrap them individually in plastic wrap or aluminum foil and place them in an airtight container. Thaw at room temperature before serving.
Special Equipment
You will need a few essential tools to prepare these brownies successfully:
– Mixing bowls
– Whisk or electric mixer
– Spatula for spreading the batter
– 8-inch square baking pan (or your desired size)
– Parchment paper (optional but recommended for easy removal)
Frequently Asked Questions
How do I know when the brownies are done baking?
Insert a toothpick into the center; if it comes out with a few moist crumbs, the brownies are perfect. If it comes out wet, bake for a few more minutes.
Can I make these brownies ahead of time?
Yes, you can prepare them a day in advance. Just make sure to store them properly to maintain freshness.
Can I replace the almond flour with another flour?
Almond flour provides a unique texture and flavor, but you could experiment with coconut flour. Adjust the liquid in the recipe since coconut flour absorbs more moisture.
What’s the best way to cut brownies?
Use a sharp knife and wipe it clean between cuts to ensure clean edges on each brownie.
Can I add other flavors or mix-ins?
Absolutely! Feel free to fold in chocolate chips, caramel bits, or your favorite spices for an extra layer of flavor.
Conclusion
The Fudgiest Gluten-Free Brownies are not just a dessert; they are an experience that brings joy with every bite. Their rich flavor, delightful texture, and versatility make them a must-try for any occasion. With this straightforward recipe, you can create a batch that will impress friends and family alike.

Fudgiest Gluten-Free Brownies: An Incredible Ultimate Recipe with 10 Ingredients
- Total Time: 32 minute
Ingredients
– 1 cup almond flour
– 1/2 cup unsweetened cocoa powder
– 1 cup granulated sugar
– 1/2 teaspoon salt
– 1/4 teaspoon baking soda
– 3 large eggs
– 1/2 cup melted butter (or coconut oil for dairy-free option)
– 1 teaspoon vanilla extract
– 1 cup semi-sweet chocolate chips
– Optional: 1/2 cup chopped nuts (walnuts, pecans, or your choice)
Instructions
Follow these straightforward steps to create the Fudgiest Gluten-Free Brownies:
1. Preheat the Oven: Preheat your oven to 350°F (175°C) and grease an 8-inch square baking pan or line it with parchment paper.
2. Mix Dry Ingredients: In a large bowl, combine the almond flour, cocoa powder, granulated sugar, salt, and baking soda. Stir until well combined.
3. Combine Wet Ingredients: In another bowl, whisk together the eggs, melted butter, and vanilla extract until smooth.
4. Combine Mixtures: Gradually pour the wet ingredients into the dry ingredients. Stir until just combined, being careful not to overmix.
5. Add Chocolate Chips: Fold in the semi-sweet chocolate chips, and the optional nuts if you’re using them, to give your brownies an exciting texture.
6. Pour Batter: Transfer the brownie batter to the prepared baking pan. Spread evenly using a spatula.
7. Bake: Place in the preheated oven and bake for 25-30 minutes. The brownies should be set on the edges but slightly soft in the center.
8. Cool: Remove from the oven and let the brownies cool in the pan for about 20 minutes. Once cooled, lift them out using the parchment paper if you used it and cut into squares.
9. Serve: Once cut, feel free to garnish with additional chocolate chips, nuts, or a dusting of powdered sugar for presentation.
Following these steps will ensure you create a batch of fudgy, gooey brownies that everyone will love.
- Prep Time: 20 minutes
- Cook Time: 25-30 minutes
Nutrition
- Serving Size: 16 squares
- Calories: 230 kcal per square
- Fat: 12g
- Protein: 4g