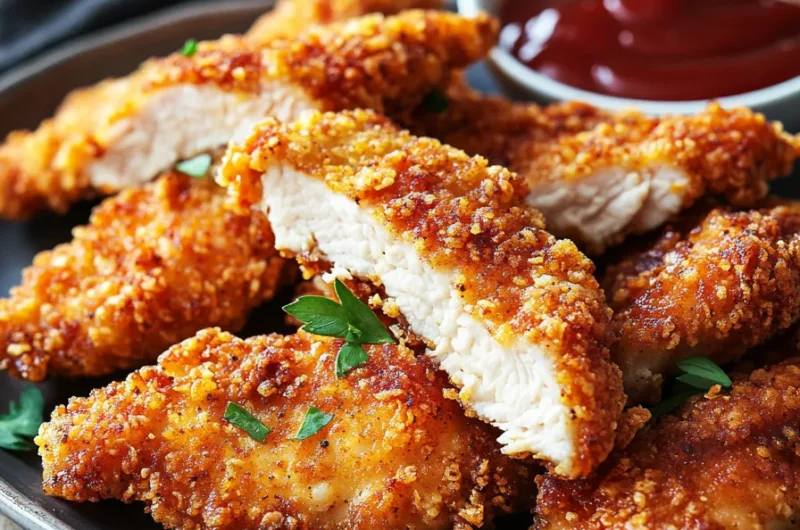
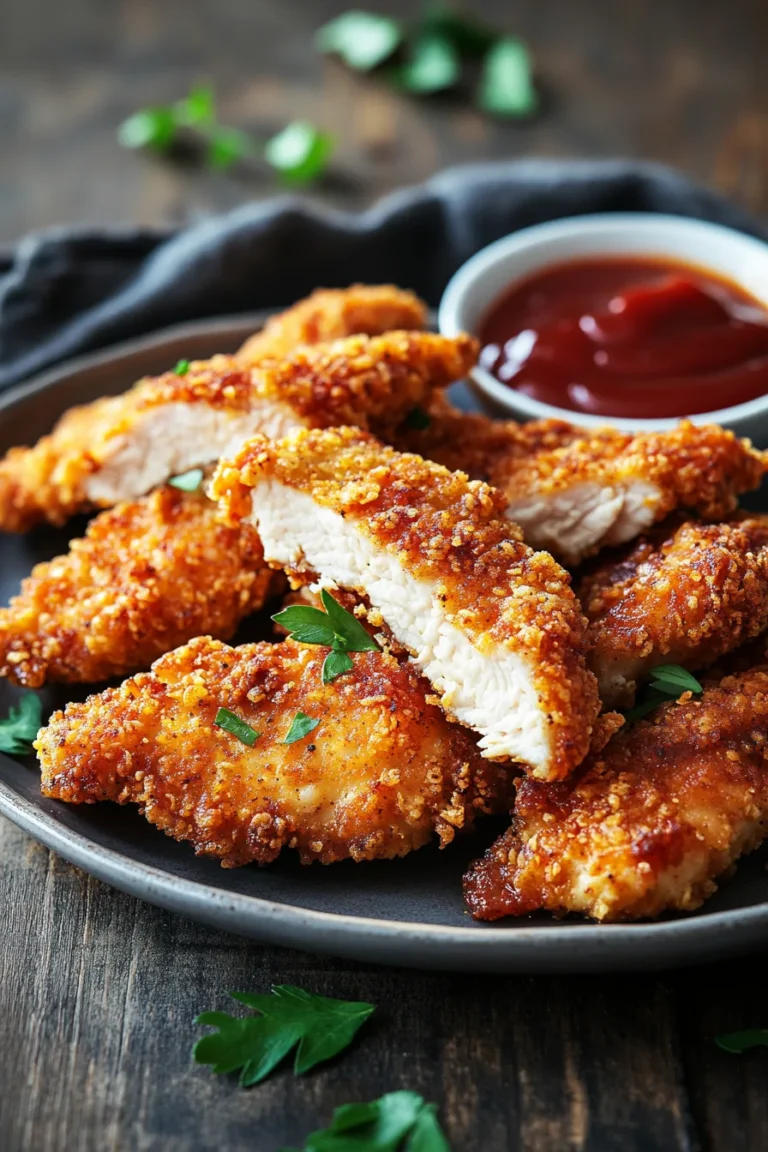
Crispy Homemade Baked Chicken Tenders are an amazing option for those craving a delicious and healthier alternative to fried chicken. This recipe not only focuses on flavor but also on the crispiness that everyone loves. Perfect for family dinners, game day snacks, or casual gatherings, crispy chicken tenders bring everyone together. They are easy to prepare and can please even the pickiest eaters. Plus, by baking instead of frying, you reduce the fat content without sacrificing taste, making it a guilt-free indulgence.
If you’ve ever found yourself longing for that crunchy, golden-brown exterior that typically comes from deep frying, this baked version will exceed your expectations. These chicken tenders are coated in a delightful blend of seasonings and breadcrumbs, ensuring each bite is packed with flavor and the perfect crunch. Imagine serving these at your next party amid delicious dips like honey mustard or barbecue sauce, making them an instant hit. In this guide, we will explore why this recipe is so special, how to make these tenders, and tips for serving them perfectly.
With a combination of tender chicken, a savory coating, and a baking method that keeps them crispy, this recipe is a game-changer. You’ll be amazed at how easily these homemade baked chicken tenders can become a staple in your kitchen. So, let’s dive into the details and discover what makes them irresistible to both kids and adults alike!
Why You’ll Love This Recipe
Crispy Homemade Baked Chicken Tenders are not just a quick meal; they’re a versatile dish that can bring joy to any dining occasion. Here are some reasons why you’ll fall in love with this recipe:
1. Healthier Option: Baking allows for lower fat content compared to frying, which is great for health-conscious eaters.
2. Crunchy Texture: The unique coating ensures that every bite is as crispy as you dream of.
3. Easy to Prepare: With minimal prep and cooking time, it’s a straightforward dish to whip up, even on busy weeknights.
4. Customizable Flavors: You can easily adjust spices and seasonings to suit your family’s tastes, making them endlessly versatile.
5. Kid-Friendly: Children love the taste and crunch, making it easy to please the whole family.
6. Perfect for Dipping: They pair well with various sauces, enhancing the overall eating experience.
With these compelling reasons, it’s no wonder that Crispy Homemade Baked Chicken Tenders are a household favorite. They provide a unique combination of flavor, convenience, and health benefits that can meet everyone’s expectations.
Preparation and Cooking Time
When making Crispy Homemade Baked Chicken Tenders, it’s important to plan your time wisely. Here’s how the timing breaks down:
– Preparation Time: 15-20 minutes
– Cooking Time: 20-25 minutes
– Total Time: Approximately 40-45 minutes
Although the total time may vary slightly based on your familiarity with the recipe or kitchen pace, this framework gives you a clear idea of what to expect.
Ingredients
– 1 ½ pounds chicken tenders
– 1 cup buttermilk
– 2 cups breadcrumbs (preferably panko for extra crunch)
– 1 teaspoon paprika
– 1 teaspoon garlic powder
– 1 teaspoon onion powder
– 1 teaspoon dried thyme
– ½ teaspoon salt
– ½ teaspoon black pepper
– 1 tablespoon olive oil
– Cooking spray (for baking)
Step-by-Step Instructions
Creating Crispy Homemade Baked Chicken Tenders is quite simple if you follow these steps:
1. Marinate Chicken: Place the chicken tenders in a bowl. Pour the buttermilk over the chicken, ensuring they are well coated. Let marinate for at least 30 minutes in the fridge.
2. Preheat Oven: Set your oven to 400°F (200°C) and line a baking sheet with parchment paper or aluminum foil.
3. Prepare Coating: In a shallow dish, mix together the breadcrumbs, paprika, garlic powder, onion powder, thyme, salt, and black pepper.
4. Coat Chicken: Remove each chicken tender from the buttermilk, allowing excess to drip off. Dredge in the breadcrumb mixture, pressing gently to ensure a good coating.
5. Arrange on Baking Sheet: Place the coated chicken tenders on the prepared baking sheet in a single layer.
6. Add Olive Oil: Drizzle olive oil over the tenders or lightly spray with cooking spray for added crispiness.
7. Bake: Cook in the preheated oven for about 20-25 minutes or until golden brown and internal temperature reaches 165°F (74°C).
8. Cool Before Serving: Remove from the oven and let the tenders cool for a few minutes before serving.
By following these straightforward steps, you can effortlessly create delicious and crispy chicken tenders in your own kitchen.
How to Serve
Serving Crispy Homemade Baked Chicken Tenders can elevate your meal into an experience. Here are some suggestions to ensure your presentation and experience are top-notch:
1. Serving Dish: Use a large platter or individual servings, which looks appealing and organizes the tenders nicely.
2. Accompaniments: Consider serving with a variety of dips such as honey mustard, ranch dressing, or a spicy aioli to cater to different taste preferences.
3. Garnish: Fresh herbs, like parsley or cilantro, can add a pop of color and a fresh touch to the plate.
4. Accompanying Sides: Pair the tenders with sides like coleslaw, fries, or a fresh salad to make a complete meal.
5. Casual Presentation: For game days or parties, serve in smaller pieces or as sliders for easy handling and sharing.
By taking the time to present your Crispy Homemade Baked Chicken Tenders thoughtfully, you will impress your guests and enhance the overall dining experience.
Additional Tips
– Use Quality Chicken: Opt for fresh, high-quality chicken tenders for the best flavor and texture.
– Experiment with Spices: Don’t hesitate to adjust or add more spices to the breadcrumb mixture to enhance flavor.
– Keep an Eye on Cooking Time: Everyone’s oven is different. Check your chicken tenders a few minutes early to avoid overcooking.
– Let Them Rest: Allow the tenders to rest for a couple of minutes after baking. This helps retain their juices for a more flavorful bite.
– Serve Hot: For the best experience, serve the tenders immediately after baking while they are still hot and crispy.
Recipe Variation
Get creative in the kitchen! Here are some variations you can try with your Crispy Homemade Baked Chicken Tenders:
1. Spicy Kick: Add cayenne pepper or chili powder to the breadcrumb mixture for a spicy version that packs a punch.
2. Cheesy Tenders: Mix grated parmesan cheese into the breadcrumb coating for an added depth of flavor.
3. Gluten-Free Option: Substitute traditional breadcrumbs with gluten-free options or crushed rice cereal for those with dietary restrictions.
4. Herbed Tenders: Incorporate fresh herbs like rosemary or oregano into the breadcrumb mix to introduce more aromatic flavor profiles.
5. Asian-Inspired: Season the chicken with soy sauce and ginger, then coat with panko breadcrumbs mixed with sesame seeds for an Asian twist.
Freezing and Storage
– Storage: Store any leftover chicken tenders in an airtight container in the refrigerator for up to 3 days to keep them fresh.
– Freezing: To freeze chicken tenders, let them cool completely, then place them in a freezer-safe bag or container. They can last in the freezer for up to 3 months.
– Reheating: When ready to eat, reheat in the oven at 375°F (190°C) for about 10-15 minutes. This will help restore their crispiness.
Special Equipment
You don’t need much in terms of specialized equipment to whip up these delicious tenders. Here’s what you might want to have:
– Baking Sheet: A large, flat baking sheet to arrange your chicken tenders.
– Parchment Paper: Optional but helps for easier cleanup and prevents sticking.
– Shallow Dishes/Bowls: For marinating and coating the chicken tenders.
– Meat Thermometer: Useful for checking that the chicken has reached a safe internal temperature of 165°F (74°C).
Frequently Asked Questions
Can I use chicken breasts instead of tenders?
Yes, you can slice chicken breasts into strips to achieve a similar result. Ensure they are even in size for consistent cooking.
What can I serve with these chicken tenders?
They pair beautifully with sides like mashed potatoes, mac and cheese, or a fresh salad.
What dipping sauces work best?
Consider serving with honey mustard, ranch dressing, hot sauce, or a classic barbecue sauce.
Can I air fry these chicken tenders instead of baking?
Absolutely! Air frying is a great option. Cook at 375°F (190°C) for about 10-12 minutes, flipping halfway through, until crispy.
How do I know when my chicken tenders are done?
The safest way to check is by using a meat thermometer. The internal temperature should reach 165°F (74°C), and the tenders should be golden brown.
Conclusion
Crispy Homemade Baked Chicken Tenders are a delightful addition to any meal, balancing flavor with health-conscious preparation. Their crispy exterior and juicy interior make them irresistible for both adults and children. Whether served at family dinners, game day parties, or casual gatherings, these tenders will undoubtedly please the crowd. With easy preparation and the possibility for variations, you can enjoy tailored flavors that cater to any palate. Now that you have discovered this delicious recipe, it’s time to make Crispy Homemade Baked Chicken Tenders a staple in your kitchen!
Crispy Homemade Baked Chicken Tenders: An Incredible Ultimate Recipe
- Total Time: 17 minute
Ingredients
– 1 ½ pounds chicken tenders
– 1 cup buttermilk
– 2 cups breadcrumbs (preferably panko for extra crunch)
– 1 teaspoon paprika
– 1 teaspoon garlic powder
– 1 teaspoon onion powder
– 1 teaspoon dried thyme
– ½ teaspoon salt
– ½ teaspoon black pepper
– 1 tablespoon olive oil
– Cooking spray (for baking)
Instructions
Creating Crispy Homemade Baked Chicken Tenders is quite simple if you follow these steps:
1. Marinate Chicken: Place the chicken tenders in a bowl. Pour the buttermilk over the chicken, ensuring they are well coated. Let marinate for at least 30 minutes in the fridge.
2. Preheat Oven: Set your oven to 400°F (200°C) and line a baking sheet with parchment paper or aluminum foil.
3. Prepare Coating: In a shallow dish, mix together the breadcrumbs, paprika, garlic powder, onion powder, thyme, salt, and black pepper.
4. Coat Chicken: Remove each chicken tender from the buttermilk, allowing excess to drip off. Dredge in the breadcrumb mixture, pressing gently to ensure a good coating.
5. Arrange on Baking Sheet: Place the coated chicken tenders on the prepared baking sheet in a single layer.
6. Add Olive Oil: Drizzle olive oil over the tenders or lightly spray with cooking spray for added crispiness.
7. Bake: Cook in the preheated oven for about 20-25 minutes or until golden brown and internal temperature reaches 165°F (74°C).
8. Cool Before Serving: Remove from the oven and let the tenders cool for a few minutes before serving.
By following these straightforward steps, you can effortlessly create delicious and crispy chicken tenders in your own kitchen.
- Prep Time: 15 minutes
- Cook Time: 20-25 minutes
Nutrition
- Serving Size: 4-6 servings
- Calories: 300 kcal (approximate per serving)
- Fat: 10g
- Protein: 25g