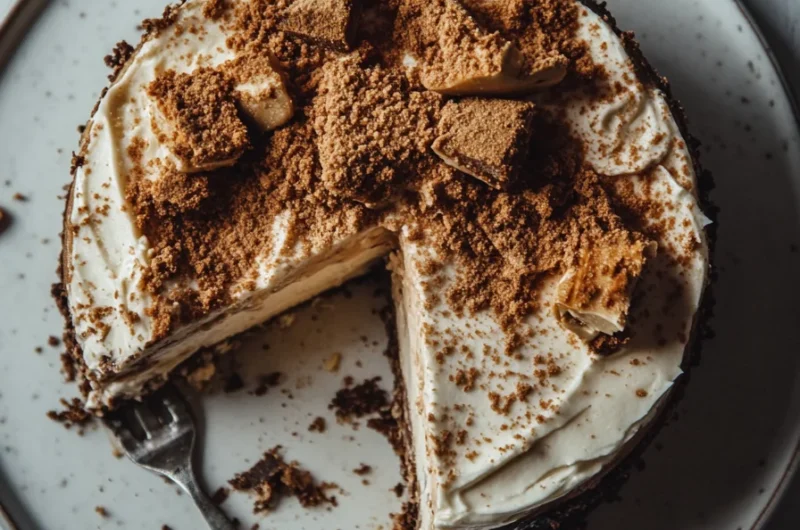
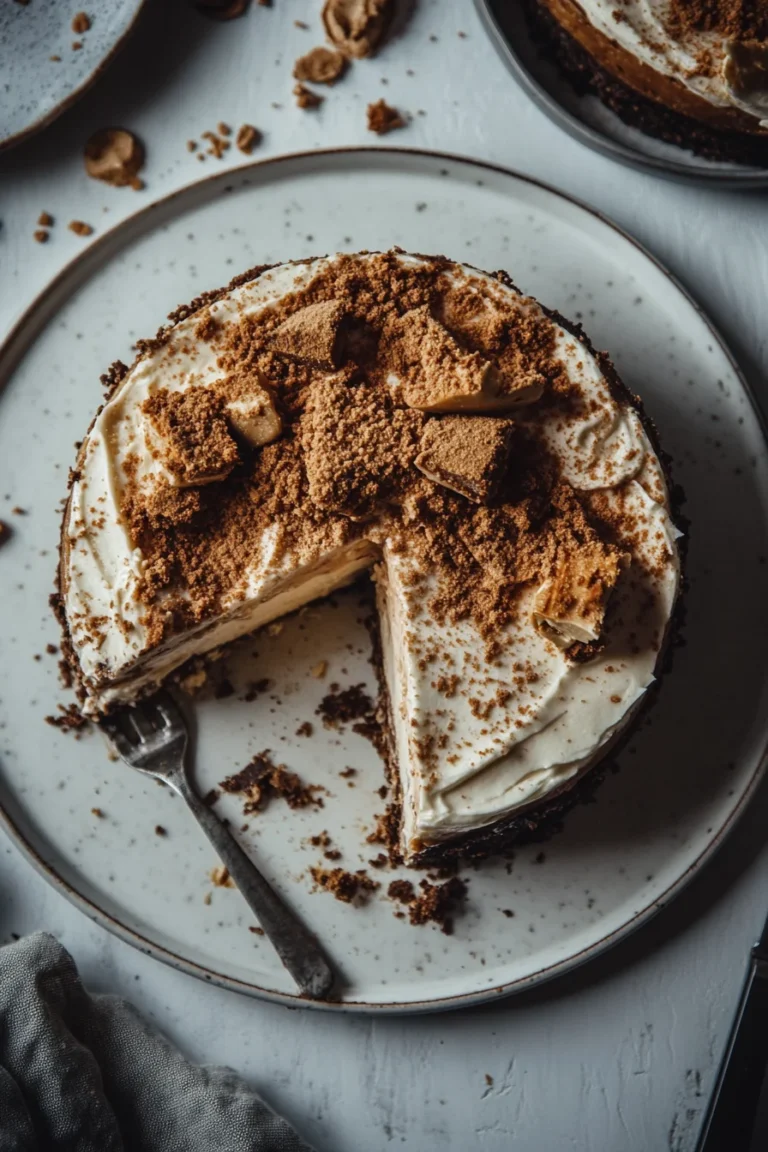
Biscoff Cheesecake is an amazing dessert that combines the rich flavors of creamy cheesecake with the delightful warmth of Biscoff cookies. This decadent treat is perfect for any occasion, transforming a simple gathering into a special event. If you’ve ever tasted the buttery, spiced-sugar flavor of Biscoff cookies, you know why they make the perfect base and topping for a cheesecake. With a luscious, velvety texture, this cheesecake isn’t just a dessert; it’s a celebration of flavors and a feast for your senses.
Imagine slicing into a Biscoff Cheesecake and revealing its creamy, dreamy center, enhanced by the crunchy and aromatic cookie crust. Each bite transports you to dessert heaven, as the flavors meld in a way that simply melts in your mouth. This recipe is not only delightful in taste, but it’s also simple enough for anyone to try—not just seasoned bakers. Whether you’re serving it at a family gathering, a birthday party, or just indulging yourself, this cheesecake promises to impress everyone.
In this guide, we’ll explore why you’ll fall in love with this Biscoff Cheesecake recipe, the time needed to prepare it, a list of ingredients, step-by-step instructions, and tips on how to serve it perfectly. You’ll soon find out why this dessert is a favorite among both newcomers and baking enthusiasts.
Why You’ll Love This Recipe
Creating a Biscoff Cheesecake is an experience that leaves lasting impressions. Here are some highlights that explain why this recipe is so beloved:
1. Irresistible Flavor: The combination of creamy cheesecake and flavorful Biscoff cookies creates a dessert that’s hard to resist.
2. No-Bake Option: This recipe can easily be adapted into a no-bake version, making it ideal for hot summers or quick gatherings.
3. Gourmet Feel: The elegant presentation makes it perfect to serve as a gourmet treat at formal events, but it’s just as delightful for casual nights in.
4. Multiple Texture Elements: The crust provides a satisfying crunch, while the cheesecake filling remains smooth and silky.
5. Customizable: You can adjust the sweetness or add extra layers of flavor, such as caramel or chocolate, to tailor it to your liking.
6. Simple Instructions: Even those new to baking can follow this recipe with friendly guidance for success.
These reasons create a recipe that people rave about! If you’re searching for a dessert that captures hearts and taste buds, look no further than Biscoff Cheesecake.
Preparation and Cooking Time
Preparing a Biscoff Cheesecake takes time, but it’s well worth the wait! Here’s a breakdown of the time involved:
– Preparation Time: 30 minutes
– Chilling Time: 4 hours (or overnight for best results)
– Total Time: 4 hours 30 minutes to 24 hours
These times can vary based on experience, but this gives a good estimate for planning your baking session.
Ingredients
– 250g Biscoff cookies (plus extra for topping)
– 100g unsalted butter, melted
– 600g cream cheese, softened
– 200g powdered sugar
– 300ml heavy whipping cream
– 2 teaspoons vanilla extract
– 1 tablespoon lemon juice
– A pinch of salt
Step-by-Step Instructions
Creating your own Biscoff Cheesecake is a straightforward process. Follow these easy steps:
1. Prepare the Crust: Crush the Biscoff cookies into fine crumbs using a food processor. In a bowl, mix the crushed cookies with melted butter until well combined.
2. Press the Crust: Press the mixture firmly into the bottom of a 9-inch springform pan. Use the bottom of a glass to pack it evenly. Chill in the refrigerator while preparing the filling.
3. Beat the Cream Cheese: In a large bowl, beat the softened cream cheese with an electric mixer until smooth and creamy, about 2-3 minutes.
4. Add Sugar and Flavoring: Gradually add the powdered sugar, vanilla extract, lemon juice, and a pinch of salt. Mix until fully combined.
5. Whip the Cream: In another bowl, whip the heavy cream until stiff peaks form. This will add lightness to your cheesecake filling.
6. Combine Mixtures: Gently fold the whipped cream into the cream cheese mixture. Be careful not to deflate the whipped cream; you want to maintain that fluffiness.
7. Pour the Filling: Spoon the cheesecake filling over the chilled crust in the springform pan, spreading it smoothly with a spatula.
8. Chill the Cheesecake: Cover the cheesecake with plastic wrap and chill in the refrigerator for at least 4 hours, or preferably overnight.
9. Garnish Before Serving: Once set, remove the cheesecake from the springform pan. Top with crushed Biscoff cookies for a decorative and delicious touch.
Following these steps will ensure you create an incredible Biscoff Cheesecake that will delight your guests.
How to Serve
Serving a Biscoff Cheesecake requires a bit of thought to enhance the experience. Here are some tips for the perfect presentation:
1. Slice with Care: Use a warm knife to cut the cheesecake into clean slices. This helps maintain the integrity of each piece.
2. Creative Toppings: Consider adding a drizzle of caramel sauce or melted chocolate over the cheesecake, along with extra Biscoff crumbs for flair.
3. Garnish with Whipped Cream: Place dollops of whipped cream around each slice for added indulgence.
4. Pair with Beverages: Serve with a cup of coffee, tea, or even dessert wine to elevate the dining experience.
5. Plate Presentation: Use elegant plates to elevate the look. A fresh mint leaf or a sprinkle of cocoa powder can serve as a lovely accent.
By following these serving tips, you can elevate your Biscoff Cheesecake experience for both you and your guests, making each bite a moment to savor. This amazing dessert will surely leave a lasting impression!
Additional Tips
– Use Room Temperature Ingredients: Ensure that your cream cheese and heavy cream are at room temperature. This helps create a smoother filling and reduces the chance of lumps.
– Don’t Rush the Chilling Process: Allow the cheesecake to chill for at least four hours, or ideally overnight. This enhances the flavors and helps with the texture.
– Decorate Just Before Serving: Garnish your Biscoff Cheesecake right before serving to keep the toppings fresh and appealing.
Recipe Variation
Explore these fun variations to make your Biscoff Cheesecake uniquely yours:
1. Chocolate Biscoff Fusion: Introduce a layer of chocolate ganache on top of the cheesecake for a rich, chocolatey twist.
2. Pumpkin Spice Biscoff: Add a bit of pumpkin puree and spice mix to the cream cheese mixture for a fall-inspired flavor.
3. Fruit Layer: For a refreshing change, layer sliced bananas or strawberries over the cream cheese filling before chilling.
Freezing and Storage
– Storage: Store leftover cheesecake in the refrigerator for up to 5 days. Ensure it’s covered to prevent it from absorbing other flavors.
– Freezing: You can freeze slices of the cheesecake for up to 2 months. Wrap each slice tightly in plastic wrap and then place it in an airtight container.
Special Equipment
Having the right tools can enhance your cheesecake-making experience:
– Springform Pan: Essential for easy removal of the cheesecake.
– Food Processor: Perfect for crushing Biscoff cookies into fine crumbs efficiently.
– Electric Mixer: Helps achieve a smooth and creamy texture in your cheesecake filling.
Frequently Asked Questions
Can I use low-fat cream cheese?
Yes, you can use low-fat cream cheese; however, the texture and flavor might be different from the traditional version.
How do I prevent cracks in my cheesecake?
Avoid overmixing the batter. Once the ingredients are combined, stop mixing. Also, ensure that you don’t open the refrigerator door too frequently while it’s chilling.
Is this recipe gluten-free?
The standard recipe contains gluten due to the Biscoff cookies. You can use gluten-free cookies to adapt this recipe for gluten-sensitive individuals.
Can I make this cheesecake vegan?
Yes! Substitute cream cheese with dairy-free alternatives and use coconut cream in place of heavy cream to create a vegan version.
What if I want to add more sweetness?
You can adjust the sweetness of your cheesecake by adding more powdered sugar to the cream cheese mixture, but do so judiciously, as the Biscoff cookies also add sweetness.
Conclusion
The Biscoff Cheesecake is not just a dessert; it’s an experience that delights every sense. With its harmonious blend of flavors and creamy texture, it stands out in any dessert lineup. The simple preparation and delicious variations make it an ideal addition to your recipe repertoire. Whether serving at a celebration or enjoying a slice at home, this cheesecake is sure to leave a lasting impression.
Biscoff Cheesecake: An Amazing Ultimate Recipe to Indulge In
- Total Time: 37 minute
Ingredients
– 250g Biscoff cookies (plus extra for topping)
– 100g unsalted butter, melted
– 600g cream cheese, softened
– 200g powdered sugar
– 300ml heavy whipping cream
– 2 teaspoons vanilla extract
– 1 tablespoon lemon juice
– A pinch of salt
Instructions
Creating your own Biscoff Cheesecake is a straightforward process. Follow these easy steps:
1. Prepare the Crust: Crush the Biscoff cookies into fine crumbs using a food processor. In a bowl, mix the crushed cookies with melted butter until well combined.
2. Press the Crust: Press the mixture firmly into the bottom of a 9-inch springform pan. Use the bottom of a glass to pack it evenly. Chill in the refrigerator while preparing the filling.
3. Beat the Cream Cheese: In a large bowl, beat the softened cream cheese with an electric mixer until smooth and creamy, about 2-3 minutes.
4. Add Sugar and Flavoring: Gradually add the powdered sugar, vanilla extract, lemon juice, and a pinch of salt. Mix until fully combined.
5. Whip the Cream: In another bowl, whip the heavy cream until stiff peaks form. This will add lightness to your cheesecake filling.
6. Combine Mixtures: Gently fold the whipped cream into the cream cheese mixture. Be careful not to deflate the whipped cream; you want to maintain that fluffiness.
7. Pour the Filling: Spoon the cheesecake filling over the chilled crust in the springform pan, spreading it smoothly with a spatula.
8. Chill the Cheesecake: Cover the cheesecake with plastic wrap and chill in the refrigerator for at least 4 hours, or preferably overnight.
9. Garnish Before Serving: Once set, remove the cheesecake from the springform pan. Top with crushed Biscoff cookies for a decorative and delicious touch.
Following these steps will ensure you create an incredible Biscoff Cheesecake that will delight your guests.
- Prep Time: 30 minutes
- Cook Time: N/A
Nutrition
- Serving Size: 12 slices
- Calories: 450 kcal
- Fat: 30g
- Protein: 6g